Here's some mindless drivel on MAF converting an LSC.....
There's some pertinent pics thrown in there too.....click on 'em for a larger view.
![]()
In your quest for improved performance, suddenly your Lincoln has hit a brick wall….no matter what you screw on it in terms of trick parts and pieces it won’t speed up…..in some cases it even slows down….driveability goes to hell….worst case scenario…..you’ve blown a head gasket. Welcome to the outer reaches of Speed Density fuel injection controls. Speed density is great….realistically a lot simpler than Mass-Air, but terribly inflexible. After you radically change/improve VE of the engine, the speed density system goes "tilt" because the load/fuel mixture tables are chiseled in stone…..buried in the processor…..so when you exceed these parameters, the system can no longer effectively compute injector pulsewidth (fuel/air ratio) and timing. The net result is loss of driveability, or in extreme cases, engine failure due to detonation caused by lean mixtures and/or over-advanced timing.
Yeah, I know you naysayers are saying "but a custom chip will fix this"……correct….IF you have access to a chip burner and a wheel dyno with A/F monitoring equipment….but do you want to have the chip (re)burned every time you make another mod? You can change the air/fuel/timing parameters in the speed density system, but you can’t get rid of the inherent inflexibility that is designed in to the system.
The cure to this dilemma is a Mass-Air conversion. The first hurdle is the cruise (see LSCMAN’s and my earlier posts) and the second is the message center in the dash. Contrary to popular opinion, the dash computer WILL work with the Mustang MAF processor. The only input to the message center from the processor is a fuel flow signal from Pin 34 DOL (data out line) . This pin is unused in the MAF ‘Stang application, however the pin and signal do exist (contrary to the vague answers I received from FMS, FoMoCo, and virtually everyone else I asked).
Another thing…..all of these changes made to my LSC were done over a month or so….NOT a weekend. Once a racer, always a racer. Never change more than one thing at a time. Even though you’ve got my rambling drivel for instructions DO NOT try to do all this in one fell swoop. One step at a time….that way if something goes schitzo, you KNOW what it was and at what point things went awry. I did cruise conversion….190lph fuel pump….MAF conversion….30# injectors/chip….and then the KB blower….and subjected it to cold starts, heat soaks, and everyday driving between each change.
Scrounge Parts!
You need an ‘89-’93 Mustang MAF EEC-IV processor (stick or auto, either will work, but the stick processor is better for performance applications), a MAS (mass airflow sensor) and the wiring plug for the it, and two air intake hoses for a MAF ‘Stang (about 35-40 bucks at the Ford dealer).
Disconnect and plug the vacuum line to the MAP sensor. Don’t unhook the wires, however, it’s still used as a BARO (barometric pressure) sensor for the MAF system. Install the MAS and the hoses….make sure everything’s sealed up good…..if you use silicone make sure it’s the "sensor safe" flavor or the EEC will have an identity crisis right off the bat.
You need to get the wires from the MAS to the EEC-IV processor buried in the passenger
side kick panel. Don’t even think of trying to route them with the OEM processor
harness unless you want to remove the inner fender liner (and if you’ve done your
cruise conversion first like you’re supposed to you’ll vividly remember what a
pain in the ass that was). Inside the passenger side footwell waaaay up under the dash
just above where the carpet ends is the A/C evaporator drain boot(a black rubber gornick).
It’s held in place by a single push in fastener. Measure out (away from vehicle
centerline) 2" and up 2" from this fastener and drill a ¾ hole. This hole will
end up directly below the A/C accumulator and inside the frame rail. Feed your four MAS
wires through this hole and secure….leave ‘em long….you can stuff the
excess behind the carpet when you’re done.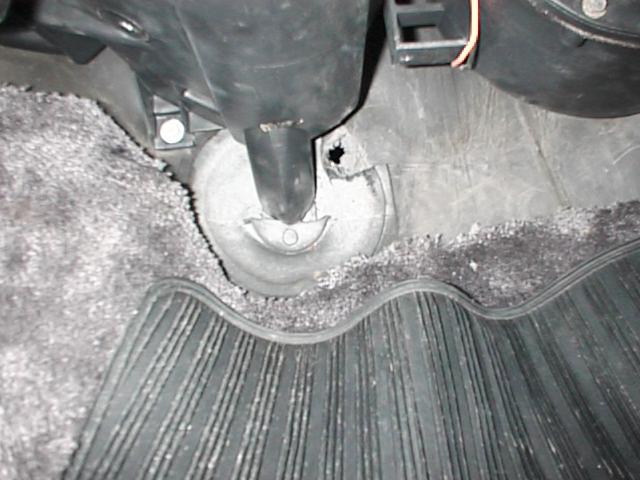
Remove the EEC-IV processor by pulling out the passenger side kick panel. Disconnect the ground leads in front of the processor, and remove the screw holding processor in. Pull processor down and out on floor and disconnect the huge gob of wires by backing out the 10mm bolt in the center of the harness plug.
Now comes the part of the job that requires complete concentration and NO mistakes (and no Budweiser, MLH, etc…..you gotta think). On the back of the gob of wires that is the processor harness is a black plastic cover. Remove and shit-can this, cause it won’t even begin to fit when you’re done. This wiring (at the processor plug) is the one part of this conversion that ain’t pretty when you’re finished….closer to "crude but effective". Fortunately, it’s gonna be out of sight. You need a sharp pick. Steal one from your local dentist/jeweler/locksmith or improvise. In the face of the EEC-IV connector that was closest to the processor is a red plastic insert that holds the pins locked in place (no, they aren’t gonna all fall out without it). Carefully, working end to end with your pick, lever this red gizmo out of the plug. Use the pick to reach in and release the lock "ears" inside the connector and remove the following wires…..pull ‘em out of the harness…..tie ‘em together…..
#2 BOO brake on/off
#35 S/C (Speed Control) vent
#38 S/C vac
#39 S/C switch –
#41 S/C switch +
#50 S/C switch
These wires will no longer used. They’re for the original cruise that already went south……
Now, ONE AT A TIME…..(trust me, do this one at a time….I didn’t and ended up checking the whole plug….60 pins….with a VOM to find out where I screwed up)
Remove wire #11 and install it in position #32
Remove wire #51 and install it in position #38
These wires control the two air mgmt. solenoids directly in front of the pass. side strut tower
Now, the wires from the MAS. There should be four….I’ll number them 1 thru 4, starting at the intake (front) end of the MAS….
#1 VPWR Splice into wire in Pin #37 on the EEC-IV connector. No goddamned scotchlocks…..solder it!.
#2 GND Splice into wire in Pin #40 . Ditto on the solder….
#3 MAF RTN Install a new EEC-IV pin ( or cut one off the discarded wires) and SOLDER it on. This is Pin #9.
#4 MAF SIGNAL Install an EEC-IV pin. This is Pin #50.
Now, take a 12’-14’ long #14 or #16 wire. Glom on to another EEC-IV pin for this wire, and put this in Pin #19, FPM (fuel pump monitor). This wire has to go to the large pink/dk blue stripe wire on the fuel pump relay. Incidentally, the fuel pump relay is on the bottom of the rear package shelf on the driver’s side. I tucked this wire under the trim panels, removed the bottom of the back seat, and pulled it up into the trunk. This wire can be attached with a sleazy/easy scotchlock or T-tap connector.
Check and double-check all your wiring and pin locations in the processor connector. Re-install the red lock insert, re-install the harness to the new MAF processor, and re-connect the ground lead you disconnected to remove the processor. Don’t reinstall the processor in it’s home in the cowl panel yet…..leave it on the floor. Re-connect the battery ( you DID disconnect it, didn’t you?) and turn on the ignition…..fuel pump should run for the requisite 3-5 seconds, and the "Check Engine" light should come on. If it doesn’t, go back to the "check & re-check" step.
Fire it up! Idle is gonna be kinda stupid at first and probably won’t be 100% until the vehicle goes through a few cold to hot cycles. Take it out and test drive/flog for a few beers/miles. No "Check Engine" light after drivin’ it? Cool! Re-install the processor up in the cowl (don’t forget the ground lead) and replace the trim panel.
Read and re-read these instructions. Get a manual that has the "pinout" diagrams for both the MkVII and the Mustang and study the diagrams until your eyes cross. The Probst manual from FMS is a good one….. If you never do any other mod to your Lincoln this is the one that you should……the improvement in performance and driveability (especially at low speeds/off idle) is beyond your wildest dreams…..throttle response is dramatically "crisper". If you can read (and evidently you can, cause you’re readin’ this) and you can wire a stereo, alarm, concert lighting system, etc. (cheap shot, eh Frank?) you CAN do this. With a little creative scrounging you should be able to do it for two or three hundred bucks. If you can’t find a used processor, go order one from your local parts store…..you oughtta be able to buy one for $100-$125 exchange if you don’t get stupid and tell ‘em what the core is out of…..just ask for one for a ‘89-’93 Mustang with a 5.0 and a stick (Carquest/Cardo reman #EM681).
![]()
Next Step…..30# injectors and chip….
Now that the MAF conversion and cruise is done and working properly, I’ll continue on and see if I can screw it up.
First thing,….you’ve got to relieve the residual pressure in the fuel system. My "crude but effective" way of doing this is whack the fuel pump inertia switch in the trunk with the jack handle so it trips, then start it up and let it stall, (you can take the boy off the farm, but you can’t take the farm out of the boy, I guess….). Disconnect the battery. Pull off upper intake (again!). If you’re REALLY careful you can lift this up and away (to the pass. side) without unhooking accelerator and TV cables and the water lines to the EGR spacer (if you still have them…I had a Cobra upper without the water to the EGR). Unhook PCV vacuum line at the driver side rear of intake. Pull off intake hose to throttle body. Remove upper-to-lower intake bolts (if your upper intake’s stock, two are hidden under the trim plate that says 5.0 HO) ,disconnect and note locations on vacuum lines on tree at rear center of intake upper. Lift and rotate upper half of intake toward passenger side and prop it up….or duct tape it to the hood hinge like I did so you can pull the fuel rail assembly.
Also take your 200 mph tape and cover the ports in the lower intake with it….if you drop shit down there you’re %#@&ed.
Disconnect supply and return fuel lines with the disconnect kit you bought from the nice man at the Carquest store. Disconnect and number the injector wires…..you mix these up and it’ll be a real slug….. Clean ALL of the crap and corruption off of the lower intake around the injectors….I used a shop vac….you don’t want any shrapnel down the injector holes. Remove 4 bolt holding fuel rail to lower half of intake. Take this over to the workbench and polish it up….there’s chrome under all that cheese and crud. Remove injectors (that didn’t stick in the rail) and account for ALL of the o-rings (2 per injector) before you go any further.
Ok, now go wash your hands, you filthy creature. Trust me, I’m going somewhere with this….when reassembling the rail/injectors cleanliness is of the utmost importance. One piece of crud and you’ve got a screwed-up injector or a fuel leak…..either of which is bad juju. Lube up the NEW (don’t reuse the old ones!) o-rings on the bottom of the injectors with a coat of white grease, ATF, Vaseline or equivalent veenerschlipper. Push injectors into lower intake one by one making sure they’re seated properly. If you don’t already have an adjustable fuel pressure regulator this is where you run and get one….major PITA to install it later. Lube up each top o-ring and re-install your cleaned and polished fuel rail (don’t waste your $ on trick aftermarket rails….stockers will support in excess of 600 hp….). After bolting down the rail, twist each injector to assure that o-rings are seated and reconnect supply and return fuel lines. Reconnect the battery. Turn the key on and off several times (DON’T, for God’s sake, turn it to start!!) to allow fuel pump to pressure up the lines/rail/injectors and check for leaks.
No leaks? Good. Reverse procedure and reassemble. Extra parts leftover (except injectors/o-rings/old FPR) is not a good sign. Chec all Vacuum connections…..PCV, FPR, EVR solenoids, etc. BTW, that is a STUPID place for a PCV valve…..only an engineer would put a service component in a God-forsaken place like that…… Get a beer/MLH/etc. Here comes another of my digressions…..
![]()
You’ve gotta alter the EEC-IV to keep the air/fuel mixtures correct with the larger injectors. A 30# injector requires a shorter pulsewidth than a 19#’er to deliver the same amount of fuel. There’s a couple of ways to do this….a recalibrated MAS, or, a stock MAS (or one like the KB that’s calibrated like the stocker) and a "chip". In the process of my blower conversion I’ve tried both….I prefer the chip (sorry Rick!) for the following reasons….."Recalibrated" MAS’s goof up the load tables in the EEC by altering the signal to the processor to represent an artificially small "air flow" to fool the EEC into delivering the correct amount of fuel even though the injectors are larger. Along with the "small" air flow comes over-advanced timing….not really a major problem with a device like the MSD-6BTM to get the timing back down under boost, but read on. The KB MAS is calibrated like the stock one (my MAF conversion was done with stock Mustang processor, 19# injectors, and the KB MAS….driveability remained 100%) so the necessary EEC calibration changes were in the "chip". This serves another purpose…..and I realized this after the fact….by using a "chip" to change EEC calibration (ie: injector pulsewidth) to correctly operate the larger injectors some sort of voodoo shit happens inside the processor and the signal at Pin 34 (DOL/data out line) is still correct! The message center in my KB’ed, MAF converted LSC w/30# injectors still CORRECTLY calculates fuel economy and "distance to empty" (and I’ve checked and re-checked it, believe me). To you this may be a stupid reason to use a chip versus a "recalibrated" MAS, but it’s my story and I’m stickin’ to it. My goal with this car was no compromises and no loss of the LSC’s many amenities. ….so I’m a proponent of "chips"….
Back to the salt mines…..Install the recalibrated MAS or chip. If you chose the chip, make SURE you clean the connections at the EEC-IV service port really well (don’t plug it in backwards, either….it’s possible….) and don’t reinstall the processor until you’re sure everything’s A-OK (like the MAF conversion).
At this stage of the game I stopped….and drove it for a week or so. Everything still functioned correctly, driveability was still 100% normal….fuel consumption (under normal conditions) was unaffected….I wanted to check everything out and assure that everything was OK. A couple of days into this week I felt comfortable enough with the car’s operation to install the 70mm throttle body. Installed it ….everything was fine EXCEPT for cold (30-40 degrees) start….it went vroom, vroom, vroom, for 20-30 seconds before stabilizing at a normal smooth idle.. If anyone has this problem after installing a larger throttle body, …..I’ll explain/tell you the fix….it’s a no-brainer but you won’t find it in any manual.
![]()